Hello, Meadow Project Lab + Cellular
This guide shows you how to set up your Meadow Project Lab + Cellular bundle board from unboxing all the way to deploying your first Meadow app from either Visual Studio 2022 or Visual Studio Code.
Meadow has multiple ways to provide connectivity capabilities to your IoT applications: WiFi, Ethernet & Cellular. Switching between network interfaces is a straightforward process, and we offer working samples for each use case:
- WiFi Sample (Code | Config)
- Ethernet Sample
- Cellular Sample
Adding the cellular module on a Project Lab
Your cellular bundle comes with these parts:
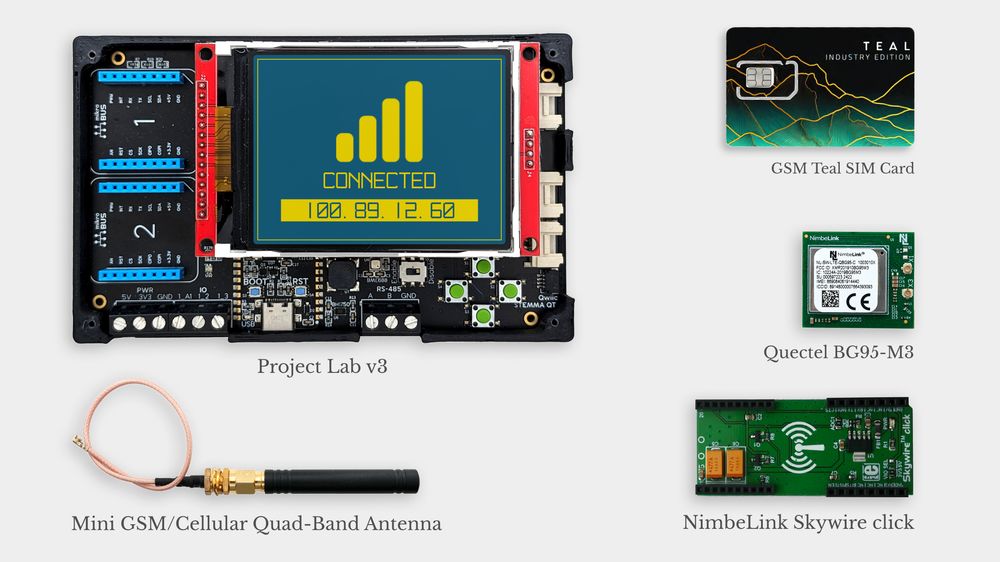
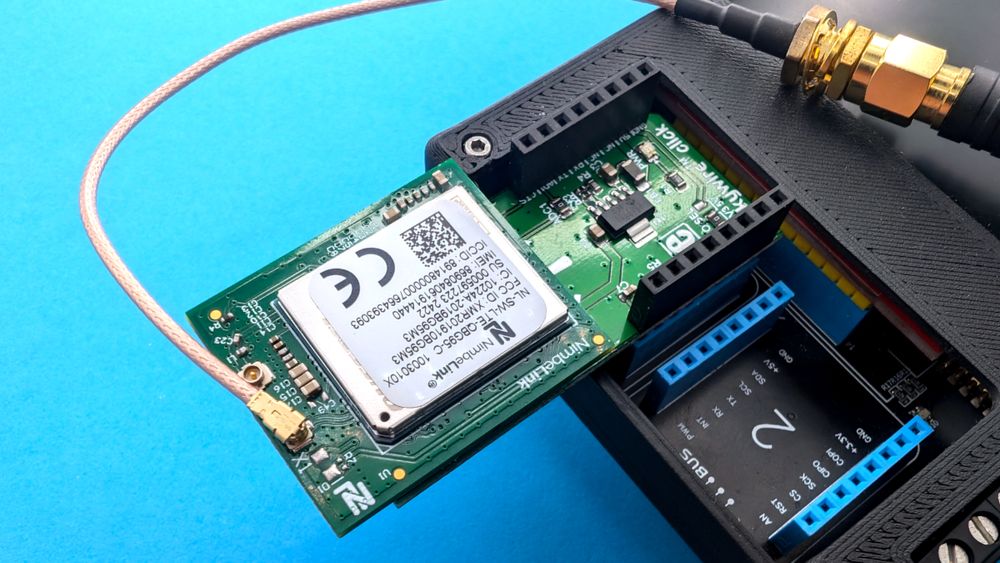
- Connect the Skywire click adapter on the MicroBus 1 connector on the project lab.
- Insert the Teal SIM card in the SIM Card slot under the BG95-M3 cellular module.
- Place the cellular module on the Skywire click adapter.
- Finally, connect the Mini GSM Antenna on the Antenna connector marked with X1.
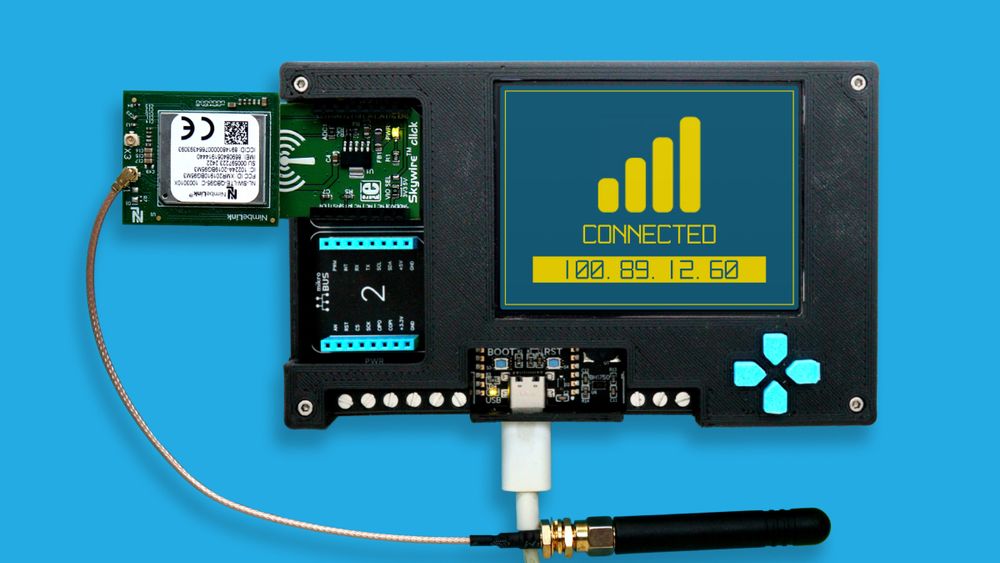
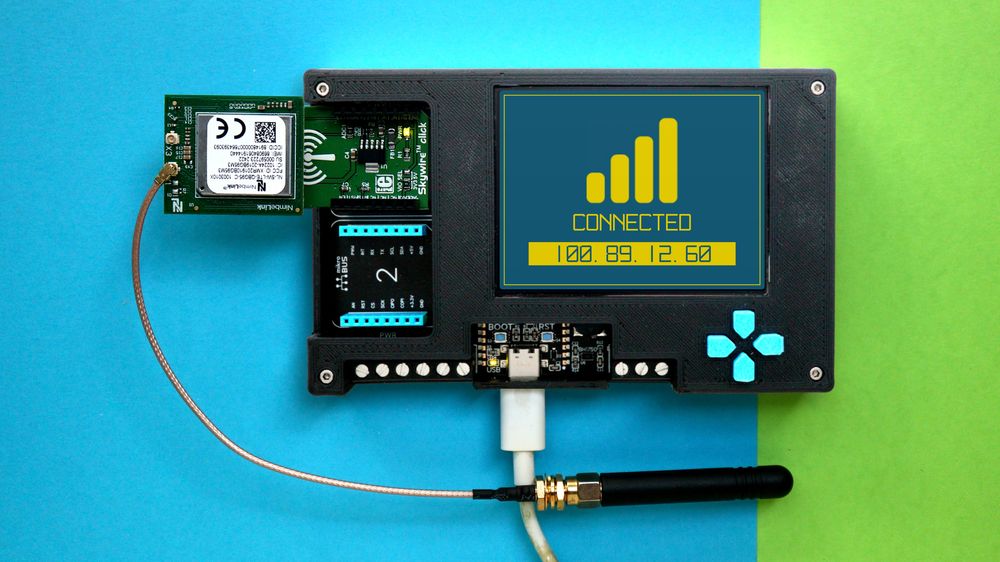
Once everything connected, it should look like this:
Activating your Teal SIM Card
First, you'll need to fill out their Account Creation Form, which would submit a request to Teal to create an account for you. As soon the account is created, they will send you and email with a link to the Teal Portal along with the login credentials.
Once you have the credentials, login to your account and you will land on the Dashboard tab, showing basic metrics such as Data Consumption, Device Network Status, eSIM Operation Status, etc.
Click on the OneChip eUICC tab where you will see your SIM Card(s). Select your card(s) on the far left end of the row and click the Actions drop down menu, and click Activate.
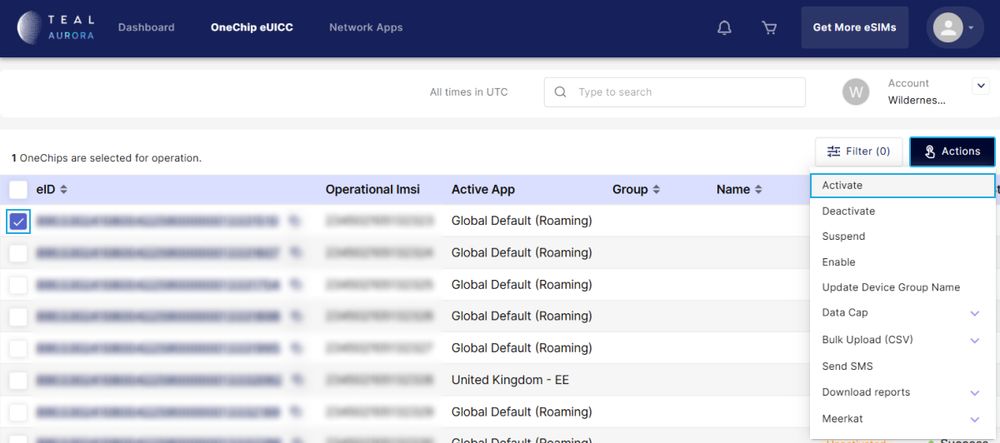
After a few seconds or a minute, refresh the site and you should see the card(s) Network Status changed to Activated.
Setting up Project Lab + Cellular
- Visual Studio 2022
- Visual Studio Code
- Meadow CLI
Step 1 - Install .NET Runtime
Download and install the latest version of the .NET runtime.
Step 2 - Deploy latest version of Meadow.OS
Follow this quick guide to Deploy Meadow.OS to your board to ensure it’s running with the latest version available.
Step 3 - Install Visual Studio
Download and Install Visual Studio 2022 for either Windows or macOS to prepare your development machine. Community edition will work fine.
Step 4 - Add Meadow Visual Studio Extension
Follow this guide to install the VS Tools for Meadow Extension for Visual Studio 2022, to deploy applications to your Meadow devices.
Step 5 - Install Meadow Project Templates
Open a console window and enter the following command to install a list of Meadow project templates:
dotnet new install WildernessLabs.Meadow.Template
When installed, you’ll see a list of templates available:
The following template packages will be installed:
   WildernessLabs.Meadow.Template

Success: WildernessLabs.Meadow.Template installed the following templates:
Template Name            Short Name          Language        Tags
-----------------------  ------------------  --------------  -------------------
Meadow Core-Compute App  meadow-ccm          [C#],F#,VB.NET  Meadow/Console
Meadow Desktop App       meadow-desktop      [C#]            Meadow/Console
Meadow F7 Feather App    meadow-feather      [C#],F#,VB.NET  Meadow/Console
Meadow Jetson Nano App   meadow-jetson-nano  [C#]            Meadow/Console
Meadow Library           meadow-library      [C#],F#,VB.NET  Meadow/Library
Meadow Project Lab App   meadow-project-lab  [C#]            Meadow/Console
Meadow Raspberry Pi App  meadow-rpi          [C#]            Meadow/Console
Meadow reTerminal App    meadow-reterminal   [C#]            Meadow/Console
Meadow StartKit App      meadow-startkit     [C#]            Meadow/App/StartKit
Step 6 - Validate hardware
To make sure you have your Project Lab up-to-date and the Cellular module is properly configured, try out our CellularSample project from our Meadow.Samples repo:
Things to consider:
- This sample doesnt need any modifications, just build and deploy it and you should see the Project Lab picking up a cellular signal, showing you the IP Address, conexion status and a signal strength indicator.
- Its recommended to be close to a window to improve signal detection.
- If signal is still not great, you might want to try switching Networks for your SIM card on the Teal Portal.
Step 7 - Deploy your application
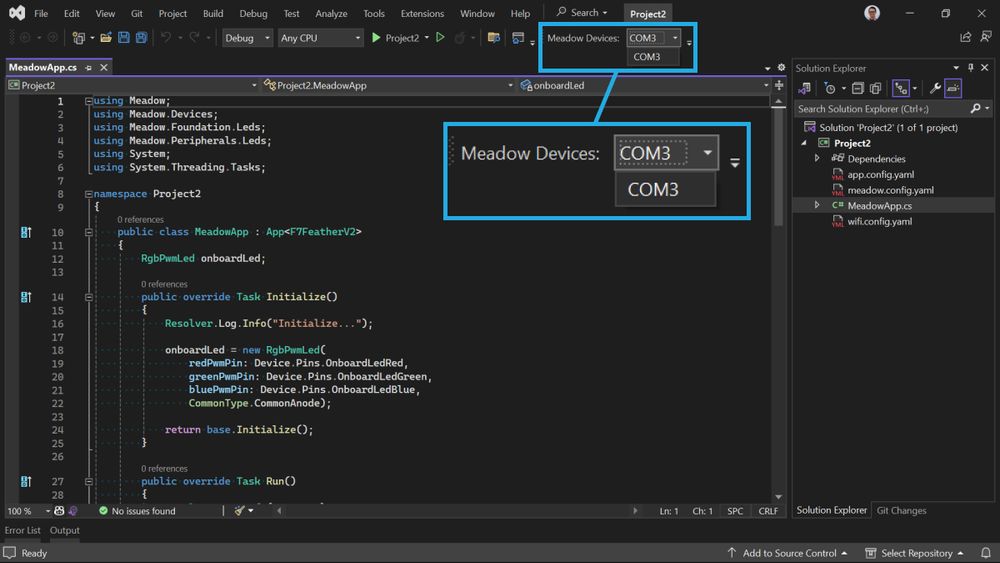
When your application is ready and builds, connect your board if disconnected, and in the Meadow devices drop down it should list its corresponding COM port. Once selected, click on the play Debug button to start transferring the application to your board.
When deploying a project for the first time, the transfer will take several minutes, since it's transferring all the necessary libraries to run the application. Once the app is running for the first time, deployment will be faster as it will transfer only the files that have been changed.
Once all the files are transferred to your device, the app will start in debug mode and you should see Project Lab's screen turn on and it will indicate your Cellular connectivity status.
Step 8 - Check out additional samples
You can check more samples in our Meadow.Samples GitHub repo.
Step 1 - Install .NET Runtime
Download and install the latest version of the .NET runtime.
Step 2 - Deploy latest version of Meadow.OS
Follow this quick guide to Deploy Meadow.OS to your board to ensure it’s running with the latest version available.
Step 3 - Install Visual Studio Code
Download and Install Visual Studio Code to prepare your development machine.
Step 4 - Add Meadow VSCode Extension
Follow this guide to install the VSCode Tools for Meadow Extension for Visual Studio Code, to deploy applications to your Meadow devices.
Step 5 - Install Meadow Project Templates
Open a console window and enter the following command to install a list of Meadow project templates:
dotnet new install WildernessLabs.Meadow.Template
When installed, you’ll see a list of templates available:
The following template packages will be installed:
   WildernessLabs.Meadow.Template

Success: WildernessLabs.Meadow.Template installed the following templates:
Template Name            Short Name          Language        Tags
-----------------------  ------------------  --------------  -------------------
Meadow Core-Compute App  meadow-ccm          [C#],F#,VB.NET  Meadow/Console
Meadow Desktop App       meadow-desktop      [C#]            Meadow/Console
Meadow F7 Feather App    meadow-feather      [C#],F#,VB.NET  Meadow/Console
Meadow Jetson Nano App   meadow-jetson-nano  [C#]            Meadow/Console
Meadow Library           meadow-library      [C#],F#,VB.NET  Meadow/Library
Meadow Project Lab App   meadow-project-lab  [C#]            Meadow/Console
Meadow Raspberry Pi App  meadow-rpi          [C#]            Meadow/Console
Meadow reTerminal App    meadow-reterminal   [C#]            Meadow/Console
Meadow StartKit App      meadow-startkit     [C#]            Meadow/App/StartKit
Step 6 - Validate Hardware
To make sure you have your Project Lab up-to-date and the Cellular module is properly configured, try out our CellularSample project from our Meadow.Samples repo:
Things to consider:
- This sample doesnt need any modifications, just build and deploy it and you should see the Project Lab picking up a cellular signal, showing you the IP Address, conexion status and a signal strength indicator.
- Its recommended to be close to a window to improve signal detection.
- If signal is still not great, you might want to try switching Networks for your SIM card on the Teal Portal.
Step 7 - Deploy your application
With no code changes, let's deploy this app to your new Project Lab.
In the Activity Bar on the side of the window, select the Run and Debug icon.
Within the Run and Debug side bar, select the configuration drop-down and select the port corresponding to your connected Meadow device.

When deploying a project for the first time, the transfer will take several minutes, since it's transferring all the necessary libraries to run the application. Once the app is running for the first time, deployment will be faster as it will transfer only the files that have been changed.
Once all the files are transferred to your device, the app will start in debug mode and you should see Project Lab's screen turn on and it will indicate your Cellular connectivity status.
Step 8 - Check out additional samples
You can check more samples in our Meadow.Samples GitHub repo.
Step 1 - Install .NET Runtime
Download and install the latest version of the .NET runtime.
Step 2 - Install Meadow CLI
Download and Install Meadow CLI if it's not installed already.
Step 3 - Deploy latest version of Meadow.OS
Follow this quick guide to Deploy Meadow.OS to your board to ensure it’s running with the latest version available.
Step 4 - Install Meadow Project Templates
Open a console window and enter the following command to install a list of Meadow project templates:
dotnet new install WildernessLabs.Meadow.Template
When installed, you’ll see a list of templates available:
The following template packages will be installed:
   WildernessLabs.Meadow.Template

Success: WildernessLabs.Meadow.Template installed the following templates:
Template Name            Short Name          Language        Tags
-----------------------  ------------------  --------------  -------------------
Meadow Core-Compute App  meadow-ccm          [C#],F#,VB.NET  Meadow/Console
Meadow Desktop App       meadow-desktop      [C#]            Meadow/Console
Meadow F7 Feather App    meadow-feather      [C#],F#,VB.NET  Meadow/Console
Meadow Jetson Nano App   meadow-jetson-nano  [C#]            Meadow/Console
Meadow Library           meadow-library      [C#],F#,VB.NET  Meadow/Library
Meadow Project Lab App   meadow-project-lab  [C#]            Meadow/Console
Meadow Raspberry Pi App  meadow-rpi          [C#]            Meadow/Console
Meadow reTerminal App    meadow-reterminal   [C#]            Meadow/Console
Meadow StartKit App      meadow-startkit     [C#]            Meadow/App/StartKit
Step 5 - Validate Hardware
To make sure you have your Project Lab up-to-date and the Cellular module is properly configured, try out our CellularSample project from our Meadow.Samples repo:
Things to consider:
- This sample doesnt need any modifications, just build and deploy it and you should see the Project Lab picking up a cellular signal, showing you the IP Address, conexion status and a signal strength indicator.
- Its recommended to be close to a window to improve signal detection.
- If signal is still not great, you might want to try switching Networks for your SIM card on the Teal Portal.
Step 6 - Deploy your application
With no code changes, let's deploy this app to your new board.
Again in your console window, use the meadow app run command to build, trim, deploy and start your Meadow application.
When deploying a project for the first time, the transfer will take several minutes, since it's transferring all the necessary libraries to run the application. Once the app is running for the first time, deployment will be faster as it will transfer only the files that have been changed.
Once all the files are transferred to your device, the app will start in debug mode and you should see Project Lab's screen turn on and it will indicate your Cellular connectivity status.
Step 7 - Check out additional samples
You can check more samples in our Meadow.Samples GitHub repo.